Helios Administration
Each EQuIS Helios site and associated data repositories are set up and enabled by EarthSoft and are connected to the organization’s EQuIS Online (EOL) site/database. Client Point of Contacts (POCs) should contact EarthSoft Support or their EarthSoft Account Manager when additional Helios repositories are desired.
Helios uses Microsoft Entra ID (aka Azure Active Directory) for authentication (user identity). Entra ID must be properly configured in the EOL site where Helios roles are setup and managed. For detailed guidance, refer to the Microsoft Entra ID documentation.
Multiple tenant Entra ID authentication is an option if a client wishes to allow access to their Helios site by outside organizations. To enable multiple Entra ID authentication, contact EarthSoft as this option is not manageable by the client.
Once a client Helios site is available, users can go to the site URL and will automatically be logged in via Entra ID. Their permissions on the site will be handled through their role membership in their organization’s Enterprise site.
Note
- Any users who are authenticated by Entra ID but who have not yet been assigned to Helios role(s) will see an empty interface and will not have access to data.
- Helios is designed to use Microsoft Entra ID for user authentication. When required by the client, any OpenID Connect compliant Identity Provider may be used to authenticate Helios users. Additional setup and configuration are required by EarthSoft and by the client.
Adding Files to Repositories
Each organization can decide how to populate their repositories. Two main options exist to load documents into Helios:
Use the built-in Explorer to upload individual files or folders.
Upon request, Microsoft will ship an Azure Data Box (Microsoft Azure Data Box Overview | Microsoft Learn) with return shipping instructions. Once loaded and received by Microsoft, the files will be loaded to the chosen Helios Repository. Contact EarthSoft about this option.
User Permissions and Roles
Helios permissions are handled by three roles for each repository (Repository Administrator, Repository Writer, and Repository Reader) in the Role Manager widget and assigning these roles to each user (as appropriate) in the EQuIS Enterprise site associated with the Helios site. These roles are independent and not additive. Thus, some users will be assigned to multiple roles.
Helios Roles
Helios-RepositoryReader-{repositoryName} – Allows users to view, download, and extract the contents of the named Helios repository.
Helios-RepositoryWriter-{repositoryName} – Allows users to write (upload and delete files) to the named Helios repository.
Helios-RepositoryAdministrator-{repositoryName} – Allows users to manage the named Helios repository, including document flagging for Personally Identifiable Information (PII) and profanity.
Repository Administration
Content in each Helios repository is managed separately. User(s) assigned to the Helios Repository Administrator role for the repository are responsible for managing the content of the repository. Select Repo Admin on the Helios header to open the Repository Administration page and then select the repository to manage from the drop-down.
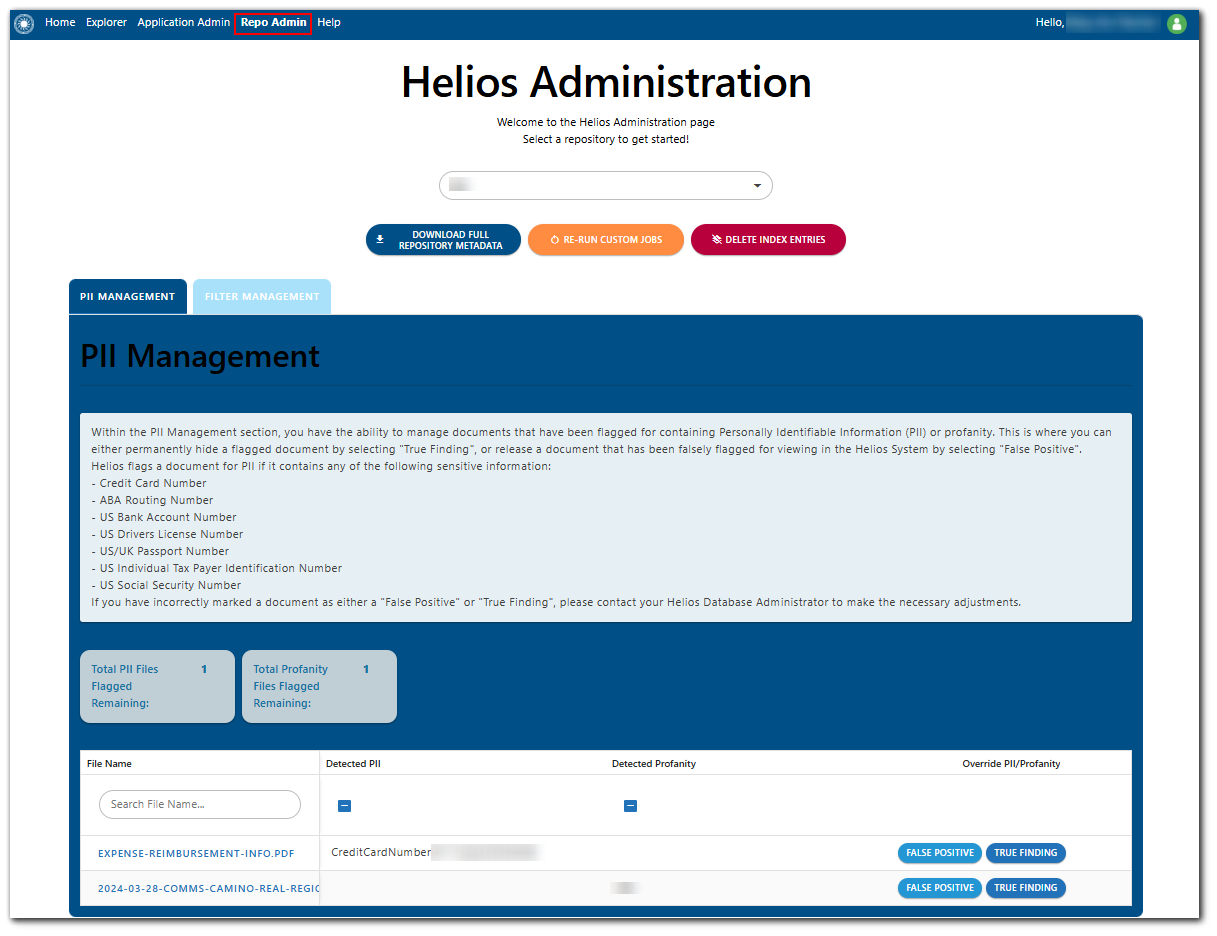
Tasks
Select the repository management task to perform.
Download Full Repository Metadata – This will provide an overview of the metadata captured in the Helios site index. Click this button to download the full repository metadata for a closer look into the documents. A message dialog will ask for confirmation prior to completing this task.
Re-run Custom Jobs – Click this button to clear the selected repository from the Helios site index and re-run all the custom jobs. The documents will then be added back into the index. A message dialog will ask for confirmation prior to completing this task.
Delete Index Entries – Click this button to remove all documents in the selected repository from the Helios site index. To add them back, the Repository Administrator must wait for the indexer to run again at its scheduled time. The custom jobs will run soon after. Once these two actions are complete, the repository will be added back into the site index. A message dialog will ask for confirmation prior to completing this task.
PII Management and Filter Management – Use these tabs to manage documents in the selected repository.
PII Management Tab
PII is any information that can be used to distinguish or trace an individual’s identity. Helios screens documents for the following types of PII:
- Credit Card Numbers
- ABA Routing Numbers
- US Bank Account Numbers
- US Driver's License Number
- US/UK Passport Number
- US Individual Taxpayer Identification Number
- US Social Security Numbers
As documents are uploaded to the repository, the AI processing will look for PII as well as words deemed as profane. When a document is flagged as possibly containing PII or profanity, the file is automatically hidden from view in the repository and added to the PII Management tab for the repository.
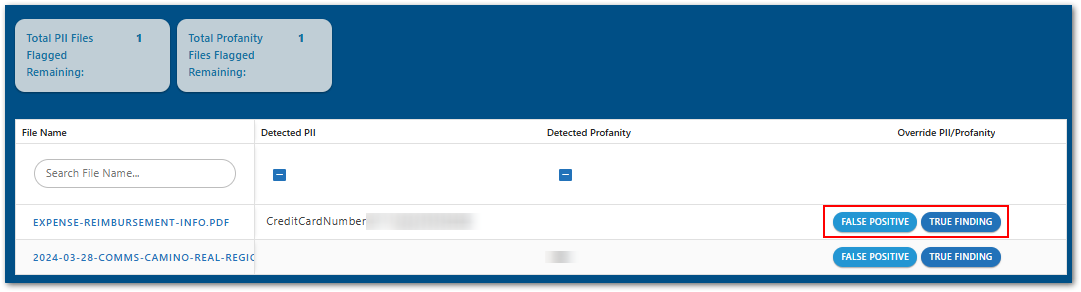
The Repository Administrators must view the file and manually choose to either permit user access to the file (False Positive) or deny user access to the file (True Finding).
Note
- False Positive: When this option is selected, the file will be visible to all users. A false positive should be selected if no PII or profanity are found in the file.
- True Finding: When this option is selected, the document will remain hidden from user view. A true finding should be selected if the file contains PII or profanity.
For files marked as a True Finding, the Repository Administrator should inform the appropriate person within the organization that the file was withheld from the repository. If the file should be in the repository, then the file can be modified/redacted and resubmitted for AI processing.
Filter Management Tab
The Repository Administrator can hide/display repository custom filters based on the document's metadata, which will be available in the Dynamic Filter section next to the Search result grid. If a file has a certain metadata value, the metadata will be added to the filters. The Repository Administrator can choose to display the filter or remove the filter. If another repository has the same metadata property, the filter will not disappear from the search results page.
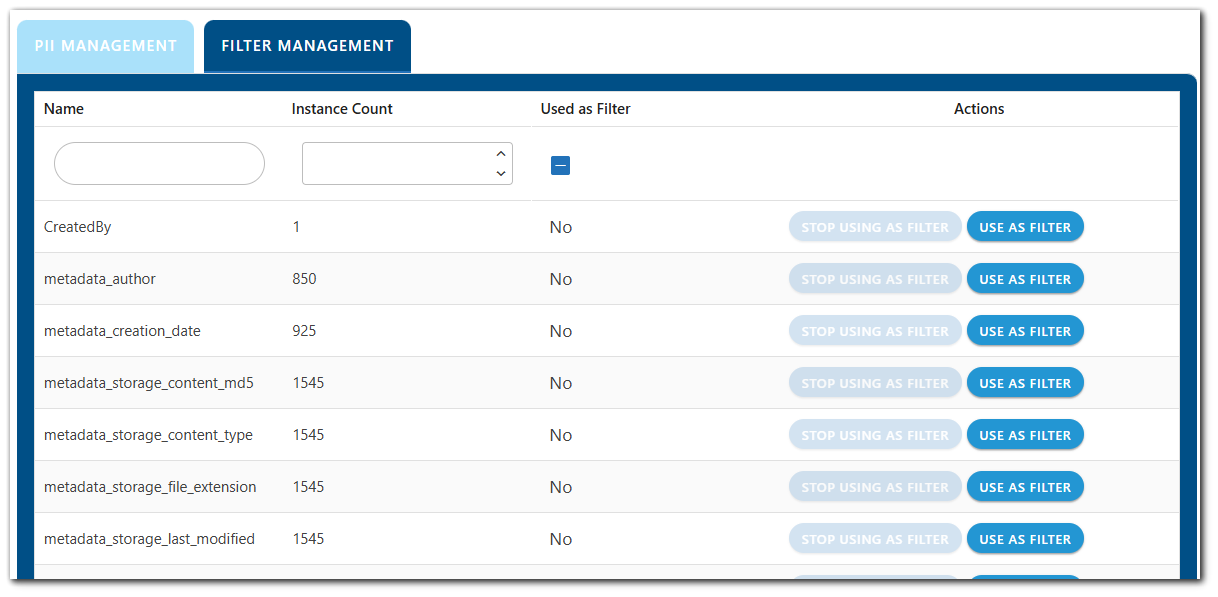
Select the appropriate button to use or clear custom filters for the selected repository.
- Stop Using as Filter – Once this button is selected, the filter will be hidden from all users and not available in the Helios Search as a filter.
- Use as Filter – Once this button is selected, the filter will be available to users in the Helios Search.
Connecting to EQuIS DT_FILE Table
Clients may elect to connect their Helios site directly to the DT_FILE table in the associated EQuIS Online Enterprise site. Files in the DT_FILE table will be copied to the first repository listed in Helios for easy access and searchability of EQuIS files. Two separate processes run with this feature:
Historical File Copy – Existing files in the DT_FILE table will be copied to appropriate folder in the Helios repository.
Re-occurring File Copy – Helios will monitor for additions to the DT_FILE table on a client-specified basis (e.g., daily). When new records are added to the DT_FILE table, the files will be copied to the appropriate folder in the Helios repository.
Clients can work with their EarthSoft representative to define how the file copy processes are setup. The following setup options can be defined in both the Historical and Re-occurring File Copy processes and can vary between the processes:
- FACILITY_ID(s) – DT_FILE records that have values in the FACILITY_ID field can have files placed in Facility Named folders that are created during the copying process. Clients may designate that files are copied from only specific facilities (and list the specific facilities), all facilities, or no facilities. Files not associated with a facility will be placed in the root folder for the repository.
- FILE_DATE – A date can be specified as a criterion to copy DT_FILE records (e.g., before, after, equal to, etc.).
- FILE_ID – The FILE_ID can be specified as a criterion to copy DT_FILE records (e.g., before, after, equal to, etc.).
Copied files will include the FILE_ID, FILE_DATE, FILE_NAME, TITLE, AUTHOR, CONFIDENTIAL_YN, and REMARK field values from the DT_FILE record as metadata properties. If the file is associated with a facility location, the location's populated DT_LOCATION fields will also be included as metadata properties. Furthermore, if a location has associated DT_LOCATION_PARAMETER records, the most recent unique PARAM_CODE and their values will also be included as metadata properties. Populated DT_LOCATION and DT_LOCATION_PARAMETER fields will be included in the metadata if the DT_FILE record is connected to a specific location either via the PLACE_TYPE and PLACE_CODE fields or OBJECT_EUID. The EQuIS table metadata properties can be used in Helios Search and can be configured as dynamic filters in the Repo Admin tab.
In addition to the Facility Name, clients can specify custom attributes (and combinations thereof) to define folder and subfolder names when copying the files from the DT_FILE table. The available custom attributes are any of the metadata fields that can be associated to the files. These attributes can be used in combination to create a concatenated folder name or to indicate multiple folders with subfolders.
For example, when a file for location B-30 at the Springfield facility is copied to Helios, the FACILITY_ID and SYS_LOC_CODE attributes could be used to create folders as follows, depending on what the client specifies:
- Single Folder Name:
- Springfield B-30
- OR
- Folder and Subfolder:
- Springfield > B-30
Then, any subsequent files related to B-30 for the Springfield facility would be copied to this folder. Files for location B-31 would be copied to a separate B-31 folder. And so on....
If the attribute field value contains a slash (/ or \), such as a date field, the slash will be replaced with an underscore (_) in the folder name as slashes are not allowed in folder names.
Important
- When files are copied to Helios, they do not maintain the same EQuIS permissions or restrictions.
- If a file with the same name already exists in the folder, the new file will have a numbered suffix added to the end of the file name before the file extension (e.g., file (1).txt, file (2).txt, etc.).
- If users delete a file that was previously copied with this feature, Helios will not recognize that the file is missing and will not attempt to copy it again from the EQuIS database.
Please contact EarthSoft Sales to enable this feature.